Hack: “Best Thing Since Sliced Bread 2.0” — Twilio Twimlets (simple business phone receptionist for $1/month)
Did you know Twilio comes with a collection of mix n match components (called Twimlets) that lets anyone build in a few minutes a simple “phone receptionist/menu” for inbound calls (you can build a lot of other things too!) that’ll cost $1/month plus a penny per minute for calls?
My friend John was getting ready to signup for Toktumi, which I’d found quite disappointing in several regards. So here’s what I helped him do instead. (You can do a lot more with Twimlets, but all my friend needed was a “receptionist” to accept and route calls to different people. This project is not a full featured phone system, although Twilio does offer an open source PBX you can download and host if you need such a thing.)
It took John and I about 15 minutes to get a new phone number and receptionist up and running thanks to the magic of Twimlets, and we did not need any website hosting (Twilio came with everything we needed).
Here’s a quick step-by-step to implement a main receptionist menu that tells the caller to “press 1 for Sales, 2 for Support, or 0 to leave a message.” It requires NO web hosting account, just a Twilio account and a Browser!
-
Create a Twilio account if you don’t have one. It comes with a $30 credit which would give you a phone number in almost any area code for a year, plus 1800 minutes of calls at a penny a minute. Free. (When you sign-up you enter a credit card number, but immediately after you signup you can if you wish remove your card and go to manual recharge to prevent unexpected bills.)
-
Grab a phone number. Twilio makes that easy,
although you have to use their web API if you want to “browse” available numbers. Update: you can now browse phone numbers, even looking for patterns like “1234”. -
At the bottom of the screen click on Twilio Labs. Then Click **Twimlets **in the menubar. Then click **Access Your Twimlets **on the right side of the screen.
we’ll do the “lower level” menu options first, then do the main receptionist menu.
- Create a voicemail box. The Voicemail twimlet lets you provide a prompt (text-to-speech, or an audio file), get a voicemail from the user, then email it to you. Automatically. For prompts we’ll use text to speech for now, but then we can use our voicemail box to record real prompts later!
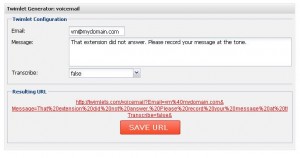
Select Voicemail from the drop down menu, then click Create New Twimlet.
Enter the email address you want voicemail to go to, and whatever prompt callers will hear. (You can also turn on or off the transcription feature, although I find it’s not accurate enough to reply upon it’s still kind of neat.)
Click save. All of your Twimlets will have the same prefix URL, and you provide the shortcut name for your Twimlet. Call this one “voicemail” and click OK.
Click the **My Twimlets **bread crumb to return to the main menu.
- Create a “find me” twimlet to try to route a call to whoever handles Sales. You can have it try multiple people in succession (they also have a Twmlet to try several people at once and the first one who answers gets the call.) In my case we just had one person to handle calls. Select Find Me **from the drop down menu, then click **Create New Twimlet. Enter the phone, and the message that they will hear (telling them to press a key if they want to accept the call). (BTW the person called will see the caller ID of the caller, not your Twilio phone number.)
For “failover” select your voicemail box from the dropdown list of your Twimlets (that’s why we created it first).

Save your Twimlet, calling it “find_sales”.
-
Repeat the previous step creating a “find_support” Twimlet, using whatever phone number you want to route support calls to.
-
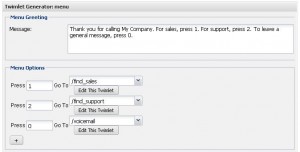
Now create the main “receptionist” menu. Back on the main menu, select “Simple Menu” and click **Create New Twimlet.
**
Fill in your main greeting, and create options 1, 2, 0 as shown, with each option pointing ot a different Twimlet.
Save it as “main_menu”
- Point your Twilio Phone number to your “main_menu” twimlet.
a. Copy the URL for your main_menu Twimlet (on the main menu, click “show URL” then select & copy the URL, it should look like http://twimlets.com/youraccountcodegoeshere/main_menu
b. Paste it into the “voice” settings for your Twilio number. Go to your main account page, click Numbers. Click the phone number. Paste the URL into the Voice text box (and make sure the checkbox is checked) then save.
That’s it. Call your number and you’ll hear your menu.
- Want to replace your main menu prompt with your friendly voice instead of text-to-speech?
Simply call your number, press 0, and record your prompt as a voicemail. In a few seconds, Twilio will email the audio’s URL to you (already hosted at Twilio for you!).
Go back to your Twimlets menu, click the main_menu Twimlet to edit it. Replace your text message “Thanks for calling…” with the audio URL (probably best to add a .wav extension). Re-save the Twimlet.
Now do the same thing to record a real voice prompt for the “voicemail” Twimlet.
Now how cool is that?


